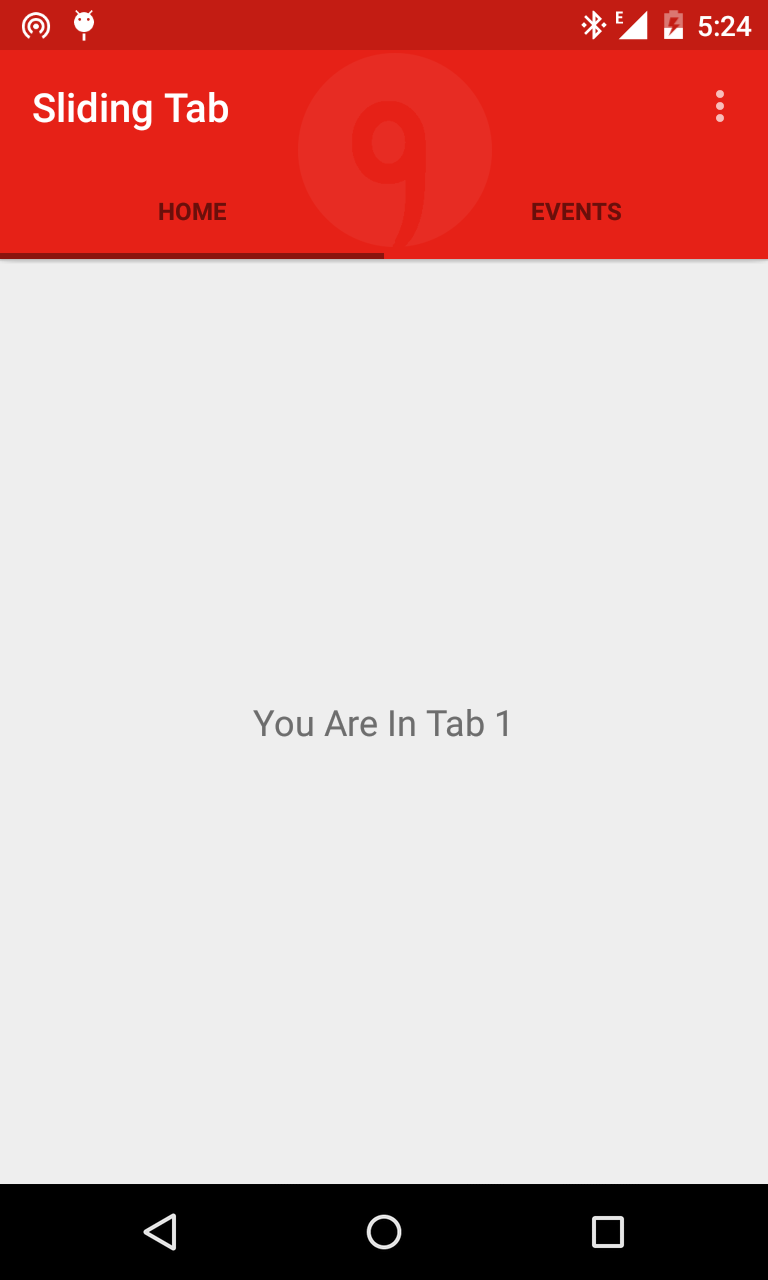
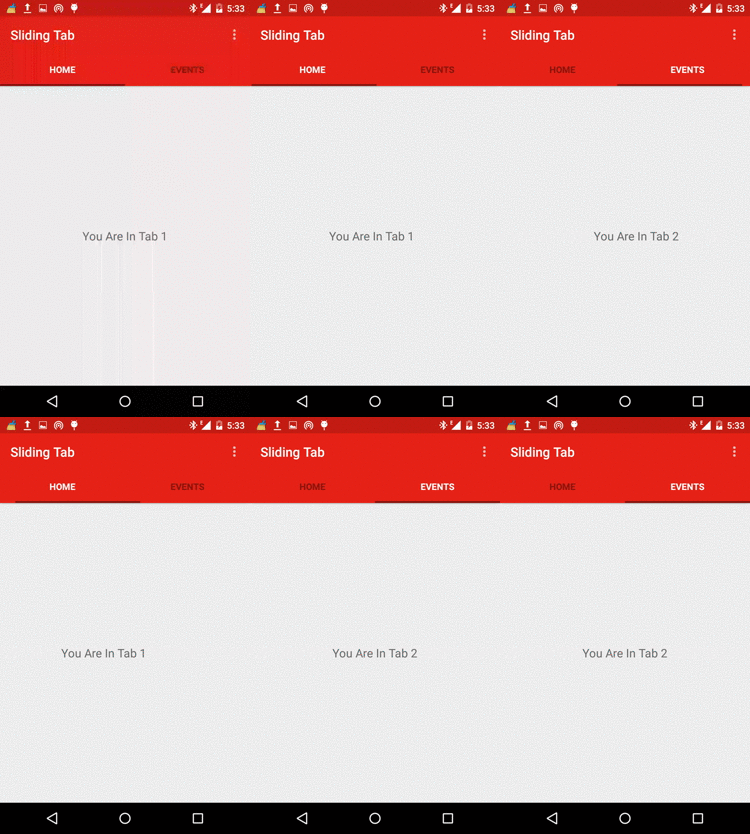
به نام خدا
امروز قصد داریم با شما آموزش ساخت زبانه کشویی در اندروید را بیاموزیم. برای شروع شما باید دو فایل زیر را کپی و در پروژه خود قرار دهید SlidingTabLayout.java و SlidingTabStrip.java توجه داشته باشید که در این آموزش شما باید با View pager ها کار کنید. برای زیبا سازی نرم افزار خود می توانید از رنگ های هلو استفاده کنید. برای ادامه آموزش به قسمت ادامه مطلب همین آموزش مراجعه نمایید.
اجازه بدید تا با هم با رنگ برنامه شروع کنیم، رنگ برنامه به زیبایی برنامه کمک خواصی می کند پس به فولدر value بروید و در آنجا به فایل color.xml توجه داشته باشید که اگر چنین فایل ندارید خودتان آن را ایجاد کنید. :) سپس color.xml
<?xml version="1.0" encoding="utf-8"?>
<resources>
    <color name="ColorPrimary">#e62117</color>
    <color name="ColorPrimaryDark">#c31c13</color>
    <color name="tabsScrollColor">#8a140e</color>
</resources>
حالا شما باید یه layout برای تب ها بسازید و اون رو در صفحه activity_main.xml بزارید. پس حالا یک layout با نام tool_bar.xml بسازید و کد های زیر رو در اون بریزید.
<?xml version="1.0" encoding="utf-8"?>
<android.support.v7.widget.Toolbar
    android:layout_height="wrap_content"
    android:layout_width="match_parent"
    android:background="@color/ColorPrimary"
    android:elevation="2dp"
    android:theme="@style/Base.ThemeOverlay.AppCompat.Dark"
    xmlns:android="http://schemas.android.com/apk/res/android" />
نوبت به اون رسیده که شما فایل تب رو به main_activity.xml اضافه کنید پس وارد اون بشید و کد های زیر رو در اون کپی کنید.
<LinearLayout xmlns:android="http://schemas.android.com/apk/res/android"
    xmlns:tools="http://schemas.android.com/tools"
    android:layout_width="match_parent"
    android:layout_height="match_parent"
    android:orientation="vertical"
    tools:context=".MainActivity">

    <include
        android:id="@+id/tool_bar"
        layout="@layout/tool_bar"
        android:layout_height="wrap_content"
        android:layout_width="match_parent"
        />

    <ir.vatandroid.slidingtab.SlidingTabLayout
        android:id="@+id/tabs"
        android:layout_width="match_parent"
        android:layout_height="wrap_content"
        android:elevation="2dp"
        android:background="@color/ColorPrimary"/>

</LinearLayout>
  حالا باید شما یک viewPager به صفحه خود اضافه کنید برای این کار main_activity.xml خود را به شکل زیر تغییر دهید.

<LinearLayout xmlns:android="http://schemas.android.com/apk/res/android"
    xmlns:tools="http://schemas.android.com/tools"
    android:layout_width="match_parent"
    android:layout_height="match_parent"
    android:orientation="vertical"
    tools:context=".MainActivity">

    <include
        android:id="@+id/tool_bar"
        layout="@layout/tool_bar"
        android:layout_height="wrap_content"
        android:layout_width="match_parent"
        />

    <ir.vatandroid.slidingtab.SlidingTabLayout
        android:id="@+id/tabs"
        android:layout_width="match_parent"
        android:layout_height="wrap_content"
        android:elevation="2dp"
        android:background="@color/ColorPrimary"/>

    <android.support.v4.view.ViewPager
        android:id="@+id/pager"

        android:layout_height="match_parent"
        android:layout_width="match_parent"
        android:layout_weight="1"
        ></android.support.v4.view.ViewPager>


</LinearLayout>
من می خواهم 2 زبانه داشته باشم پس دو فایل در layout خودم میسازم به نام های tab_1.xml و tab_2.xml توجه داشته باشید که شما هم تعداد که دوست دارید می توانید اضافه کنید. tab_1.xml
<?xml version="1.0" encoding="utf-8"?>
<RelativeLayout xmlns:android="http://schemas.android.com/apk/res/android"
    android:layout_width="match_parent"
    android:layout_height="match_parent">


    <TextView
        android:layout_width="wrap_content"
        android:layout_height="wrap_content"
        android:textAppearance="?android:attr/textAppearanceMedium"
        android:text="You Are In Tab 1"
        android:id="@+id/textView"
        android:layout_centerVertical="true"
        android:layout_centerHorizontal="true" />

</RelativeLayout>
tab_2.xml:
<?xml version="1.0" encoding="utf-8"?>
<RelativeLayout xmlns:android="http://schemas.android.com/apk/res/android"
    android:layout_width="match_parent"
    android:layout_height="match_parent">


    <TextView
        android:layout_width="wrap_content"
        android:layout_height="wrap_content"
        android:textAppearance="?android:attr/textAppearanceMedium"
        android:text="You Are In Tab 2"
        android:id="@+id/textView"
        android:layout_centerVertical="true"
        android:layout_centerHorizontal="true" />

</RelativeLayout>
حالا به من اجازه دهید تا برای این دو فایل دو فرگمنت بسازم. به شکل زیر Tab1
package ir.vatandroid.slidingtab;

import android.os.Bundle;
import android.support.annotation.Nullable;
import android.support.v4.app.Fragment;
import android.view.LayoutInflater;
import android.view.View;
import android.view.ViewGroup;

/**
 * Created by hp1 on 21-01-2015.
 */
public class Tab1 extends Fragment {

    @Override
    public View onCreateView(LayoutInflater inflater, @Nullable ViewGroup container, @Nullable Bundle savedInstanceState) {
        View v =inflater.inflate(R.layout.tab_1,container,false);
        return v;
    }
}
Tab2
package ir.vatandroid.slidingtab;

import android.os.Bundle;
import android.support.annotation.Nullable;
import android.support.v4.app.Fragment;
import android.view.LayoutInflater;
import android.view.View;
import android.view.ViewGroup;

/**
 * Created by hp1 on 21-01-2015.
 */
public class Tab2 extends Fragment {
    @Override
    public View onCreateView(LayoutInflater inflater, @Nullable ViewGroup container, @Nullable Bundle savedInstanceState) {
        View v = inflater.inflate(R.layout.tab_2,container,false);
        return v;
    }
}
حالا نوبت به آن رسیده که شما یک آداپتور برای ViewPager خود بسازید. ViewPagerAdapter
package ir.vatandroid.slidingtab;

import android.support.v4.app.Fragment;
import android.support.v4.app.FragmentManager;
import android.support.v4.app.FragmentStatePagerAdapter;

/**
 * Created by hp1 on 21-01-2015.
 */
public class ViewPagerAdapter extends FragmentStatePagerAdapter {

    CharSequence Titles[]; // This will Store the Titles of the Tabs which are Going to be passed when ViewPagerAdapter is created
    int NumbOfTabs; // Store the number of tabs, this will also be passed when the ViewPagerAdapter is created


    // Build a Constructor and assign the passed Values to appropriate values in the class
    public ViewPagerAdapter(FragmentManager fm,CharSequence mTitles[], int mNumbOfTabsumb) {
        super(fm);

        this.Titles = mTitles;
        this.NumbOfTabs = mNumbOfTabsumb;

    }

    //This method return the fragment for the every position in the View Pager
    @Override
    public Fragment getItem(int position) {

        if(position == 0) // if the position is 0 we are returning the First tab
        {
            Tab1 tab1 = new Tab1();
            return tab1;
        }
        else             // As we are having 2 tabs if the position is now 0 it must be 1 so we are returning second tab
        {
            Tab2 tab2 = new Tab2();
            return tab2;
        }


    }

    // This method return the titles for the Tabs in the Tab Strip

    @Override
    public CharSequence getPageTitle(int position) {
        return Titles[position];
    }

    // This method return the Number of tabs for the tabs Strip

    @Override
    public int getCount() {
        return NumbOfTabs;
    }
}
نوبت به فایل MainActivity.java رسیده و شما باید آن را به شکل زیر تغییر دهید.
package ir.vatandroid.slidingtab;

import android.support.v4.view.ViewPager;
import android.support.v7.app.ActionBarActivity;
import android.os.Bundle;
import android.support.v7.widget.Toolbar;
import android.view.Menu;
import android.view.MenuItem;


public class MainActivity extends ActionBarActivity {

    // Declaring Your View and Variables

    Toolbar toolbar;
    ViewPager pager;
    ViewPagerAdapter adapter;
    SlidingTabLayout tabs;
    CharSequence Titles[]={"Home","Events"};
    int Numboftabs =2;

    @Override
    protected void onCreate(Bundle savedInstanceState) {
        super.onCreate(savedInstanceState);
        setContentView(R.layout.activity_main);


        // Creating The Toolbar and setting it as the Toolbar for the activity

        toolbar = (Toolbar) findViewById(R.id.tool_bar);
        setSupportActionBar(toolbar);


        // Creating The ViewPagerAdapter and Passing Fragment Manager, Titles fot the Tabs and Number Of Tabs.
        adapter =  new ViewPagerAdapter(getSupportFragmentManager(),Titles,Numboftabs);

        // Assigning ViewPager View and setting the adapter
        pager = (ViewPager) findViewById(R.id.pager);
        pager.setAdapter(adapter);

        // Assiging the Sliding Tab Layout View
        tabs = (SlidingTabLayout) findViewById(R.id.tabs);
        tabs.setDistributeEvenly(true); // To make the Tabs Fixed set this true, This makes the tabs Space Evenly in Available width

        // Setting Custom Color for the Scroll bar indicator of the Tab View
        tabs.setCustomTabColorizer(new SlidingTabLayout.TabColorizer() {
            @Override
            public int getIndicatorColor(int position) {
                return getResources().getColor(R.color.tabsScrollColor);
            }
        });

        // Setting the ViewPager For the SlidingTabsLayout
        tabs.setViewPager(pager);


    }


    @Override
    public boolean onCreateOptionsMenu(Menu menu) {
        // Inflate the menu; this adds items to the action bar if it is present.
        getMenuInflater().inflate(R.menu.menu_main, menu);
        return true;
    }

    @Override
    public boolean onOptionsItemSelected(MenuItem item) {
        // Handle action bar item clicks here. The action bar will
        // automatically handle clicks on the Home/Up button, so long
        // as you specify a parent activity in AndroidManifest.xml.
        int id = item.getItemId();

        //noinspection SimplifiableIfStatement
        if (id == R.id.action_settings) {
            return true;
        }

        return super.onOptionsItemSelected(item);
    }
}
در اینجا به نظر می رسد که کار تمام شد اما اگر شما بخواهید که رنگ آنها را تغییر دهید و به کاربر نشان دهید که کدام گزینه فعال است. برای این کار شما باید یک selector.xml بسازید. selector.xml:
<?xml version="1.0" encoding="utf-8"?>
<selector xmlns:android="http://schemas.android.com/apk/res/android">
    <item android:state_selected="true" android:color="@android:color/white" />
    <item android:state_focused="true" android:color="@android:color/white" />
    <item android:state_pressed="true" android:color="@android:color/white" />
    <item android:color="#8a140e" />
</selector>
در ادامه برای اعمال رنگ باید وارد فایل SlidingTabLayout.java شوید و به دنبال متد private void populateTabStrip() بگردید و آن را به شکل زیر تغییر دهید.
private void populateTabStrip() {
        final PagerAdapter adapter = mViewPager.getAdapter();
        final View.OnClickListener tabClickListener = new TabClickListener();

        for (int i = 0; i < adapter.getCount(); i++) {
            View tabView = null;
            TextView tabTitleView = null;

            if (mTabViewLayoutId != 0) {
                // If there is a custom tab view layout id set, try and inflate it
                tabView = LayoutInflater.from(getContext()).inflate(mTabViewLayoutId, mTabStrip,
                        false);
                tabTitleView = (TextView) tabView.findViewById(mTabViewTextViewId);
            }

            if (tabView == null) {
                tabView = createDefaultTabView(getContext());
            }

            if (tabTitleView == null && TextView.class.isInstance(tabView)) {
                tabTitleView = (TextView) tabView;
            }

            if (mDistributeEvenly) {
                LinearLayout.LayoutParams lp = (LinearLayout.LayoutParams) tabView.getLayoutParams();
                lp.width = 0;
                lp.weight = 1;
            }

            tabTitleView.setText(adapter.getPageTitle(i));
            tabView.setOnClickListener(tabClickListener);
            String desc = mContentDescriptions.get(i, null);
            if (desc != null) {
                tabView.setContentDescription(desc);
            }

            mTabStrip.addView(tabView);
            if (i == mViewPager.getCurrentItem()) {
                tabView.setSelected(true);
            }
            tabTitleView.setTextColor(getResources().getColorStateList(R.color.selector));
            tabTitleView.setTextSize(14);
        }
    }


saeed میگه:
سلام جناب فلاح من یه تب ویو به همین شکل ساختم، سه تا تب داره توی هر کدوم یه لیست ویو هست که داره از دیتابیس پر میشه، در حد 3 یا 4تا رکورد اما تب ها لَگ دارن، روون نیستن مشکل از چیه؟
محمد فلاح به این سوال پاسخ داده که:
سلام. یعنی شما اگه کدهای گرفتن دیتا از دیتابیس رو کامنت کنید (با دو تا اسلش//) باز هم لگ داره؟ یعنی به نظرتون بخاطر دیتابیس هست یا به خاطر ویو پیجر؟ اینکار رو بکنید (کامنت کنید کد های دیتابیس رو) بعد اگه سرعت خوب شد بگید تا برای سرعت بهتر و بدون لگ راهنماییتون کنم. :) موفق باشید